Archive for the 'Recipes' Category

You are currently browsing the archives of Treasure Jar .

Quorn Non-Meat Grounds Recipe

We love Quorn non-meat grounds. It is like meat, only it isn’t. The texture is like meat and if cooked correctly, it doesn’t feel and taste like a non-meat ingredient. The kids and the hubby do not complain but instead say that it feels like they are eating meat, that is not meat.

Quorn is made with Mycoprotein, a fermented, natural, nutritious fungus taken from the soil. Mycoprotein is high in protein, high in fiber, low in saturated fat, and has no cholesterol. It’s texture is just like meat without the oil “sebo” effect when the cooked food turns cold.

Here are a few recipes I have made with the Quorn non-meat grounds:

Slowcooked Lasagna:

Sautéed with onions, garlic, a little vegetable oil and cooked with carrots and potatoes:

Sautéed with onion, garlic and cooked with tomato sauce and carrots: 

Sautéed with onions and garlic, cooked with fresh brown mushroom and tomato sauce. Add cooked penne pasta for a pasta meal.

No-Bake Choco-Nut Cake Pops

I have always wanted to make Cake Pops but I was apprehensive because I didn’t want to bake a cake only to crumble it to make these Cake Pops. So when the opportunity to join “Sarap maging kid with Inipit” or  #NoLimitWithInipit Contest was sponsored by Nuffnang, I decided to join using Inipit’s Custard Cake Sandwich as my cake base.

To make the Cake Pops healthier, I used Dried Figs and a local brand of all-natural and not so sweet peanut butter to hold the crumbled cake together instead of the usual shortening or jam or even chocolate-based spread. For the melted chocolate, I used semi-sweet chocolate. Maybe next time I will use dark chocolate instead to lessen the sweetness in the recipe. My children absolutely loved it but said it was a tad sweet for them. They are not used to eating too sweet and too salty food that’s why.

Anyway…

Ingredients:

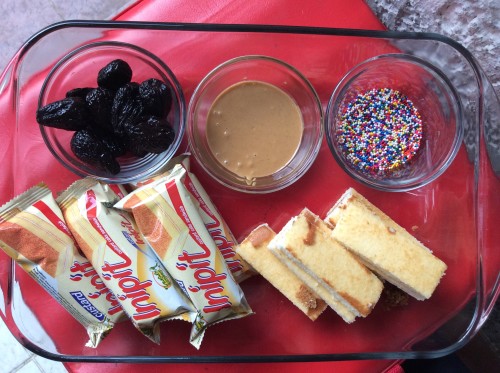
  • 5 pcs Custard flavor Inipit
  • 5 pcs Dried Figs
  • 1/3 cup local brand all-natural peanut butter
  • 1/2 pack of semi-sweet baking chocolate
  • rainbow candy sprinkles

Procedure:

crumbled Inipit

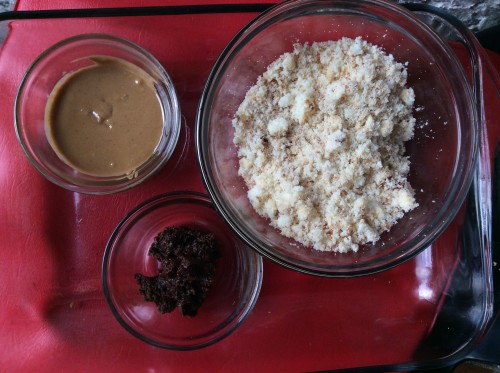
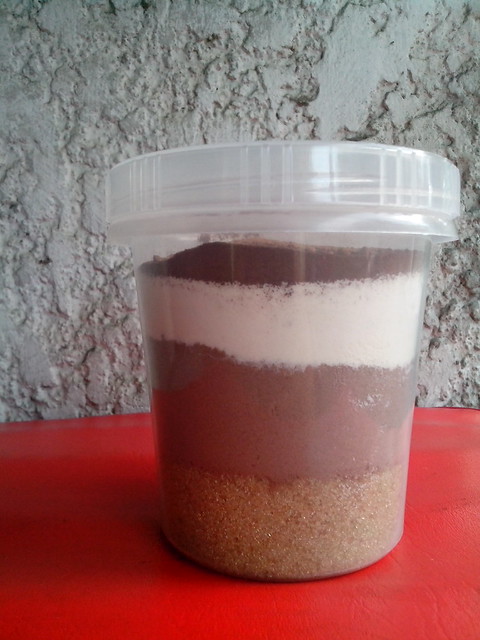
Crumble the custard inipit until almost powdery in consistency.

Put the figs in a food processor and mix till it has a pasty consistency.

Add the peanut and the figs to the crumbled custard Inipit.

Chocolate-Nut Balls

Make small balls and freeze for an hour or two.

Melted chocolate

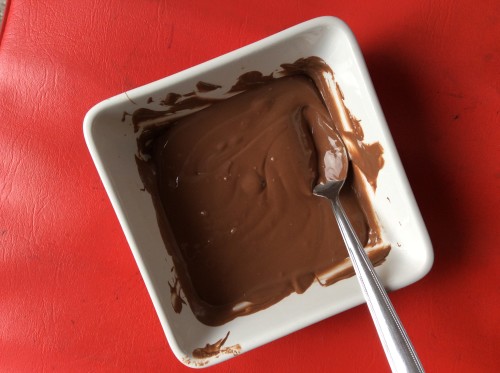
Melt the chocolate in the microwave using 1 minute/medium heat cycles. After every minute, get the microwaveable container and mix the chocolate. Repeat till all the chocolate pieces are melted and smooth.

Get the frozen choco-nut balls and insert a straw halfway in each of the balls.

Use a spoon to drip melted chocolate on the frozen choco-nut balls. Turn the straw around so that the excess chocolate will drip back in the bowl.

Sprinkle with rainbow candy sprinklers.

image


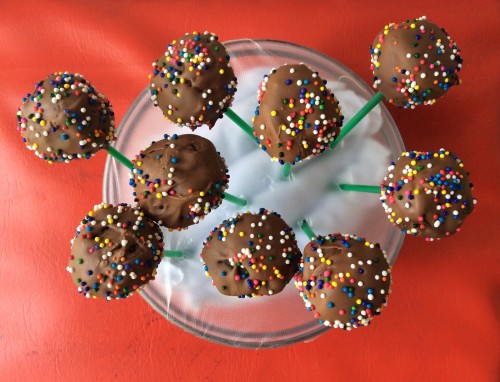
Put the Choco-Nut Cake Pops on a stand like a styro to dry. I used a baking bowl, put some clean and unused table rags inside, covered with an elastic plastic cover and inserted the straws through the plastic cover.

image


Presenting the No-Bake Choco-Nut Cake Pops with Inipit Custard Cake Sandwich as the base cake. I was able to make 13 No-Bake Choco-Nut Cake Pops. So easy to make!


Add Krem-Top to your Coffee

I am not one to put creamer in my coffee. Having tried Krem-Top in our brewed coffee is a welcome treat for me. Krem-Top is a non-dairy coffee creamer that gives all the rich taste which best complements your coffee. Relish the creaminess and savour the wonderful aroma which will make your coffee experience more enjoyable.

Krem-Top

Krem-Top is a perfect partner with a hot cuppa for a breakfast of fried rice, bacon and sausage. Yum!

Incidentally, Krem-Top has an ongoing campaign called Change for the Better.

I used Krem-Top in one of the homemade gifts I gave away last Christmas and here was what it looked like:

Coffee Mix

From bottom to top:

1 cup brown sugar
1 1/2 cups powdered chocolate milk
1 cup Krem-Top non-dairy creamer
1/3 cup coffee
1/2t cinnamon
1/2t nutmeg

Instructions: shake the container until all of the ingredients are incorporated. OR pour the ingredients in a clean bowl, stir till everything has been mixed. Transfer back in the container.

Use two heaping tablespoons to make a cup of hot creamy coffee.

Posted by Treasure Jar on Jan 16th 2015 | Filed in From the Admin's Desk,Kitchen Needs,Recipes,Reviews,Through the Lens | Comments (0)

Black Bottom Orange Cheesecakes

Black Bottom Orange Cheesecakes

Black Bottom Orange Cheesecakes

Fudge Brownie Base:
¼ cup butter
1 egg
1 tablespoon water
1 package MAYA Oven Toaster Chocolate Fudge Brownie Mix 230 g
1 tablespoon melted butter

Orange Cheesecake Filling:
2 ¼ cups cream cheese, softened
¾ cup sugar
3 eggs
1 ½ tablespoons orange zest
1 tablespoon orange-flavored liqueur
orange food color, as needed

White Chocolate Ganache:
½ cup all purpose cream
½ cup chopped white chocolate
chocolate coins, for garnish (optional)

  • Preheat oven to 350°F/177°C.
  • Prepare fudge brownie base.
  • Grease and line the bottom of a 9×5-inch rectangular pan. Set aside.
  • In a bowl, cream the butter until soft.
  • Add the egg and water and blend together.
  • Add the brownie mix and beat with a wooden spoon until smooth.
  • Pour on the prepared pan and spread batter until smooth.
  • Bake for 20 minutes or until done.
  • Once cooled, crumble the brownie and add in the melted butter.
  • Set aside.

~~~~~~~~~~~~~~~~

  • Prepare orange cheesecake filling.
  • In a mixer bowl, soften cream cheese and add sugar until creamy.
  • Add in the eggs one at a time.
  • Add the orange zest, orange-flavored liqueur and orange food color. Blend until well incorporated.
  • Prepare white chocolate ganache.
  • Place the all purpose cream in a pan and bring to a boil while stirring continuously.
  • Add the chopped white chocolate and stir until melted and combined. Set aside and cool.

~~~~~~~~~~~~~~~~~~

To assemble. Pack 2 tablespoons each of fudge brownie base at the bottom of eight (8) 4-ounce paper cups. Pour orange cheesecake filling until ¾ full. Bake for 30 minutes. Remove cheesecakes from oven. Cool. Pour white chocolate ganache on top and garnish with a chocolate coin. Serve

Yield: 8 individual cheesecakes

Note: Omit food color if a white cheesecake is desired.

Posted by Treasure Jar on Oct 23rd 2014 | Filed in For Little Hands,FYI,Recipes | Comments (0)

Samsung Smart Oven : Choco Banana Cake

One of the recipes we enjoyed tasting during the Samsung Digital Appliance Saturdate with Mom event that my youngest child and I went to was Chef Jaq’s Choco Banana Cake baked in a Samsung Smart Oven.

Chef Jac's Choco Banana  Cake

We love putting bananas and chocolate in baked goodies, like this Banana, Oats and Chocolate Chips Bread we bake at home.

Samsung Smart Oven

Here is recipe of the Choco Banana Cake by Chef Jaq Laudico baked in a Samsung Smart Oven:

Ingredients:

  • 600grms apf,
  • 50 g cocoa powder
  • 48g baking powder
  • 8g baking soda
  • 1200 g coco sugar
  • 125ml oil
  • 375 ml water
  • 150 gm butter
  • 600g banana
  • 83.3g milk

How to Prepare:

  • Sift together cocoa powder, flour ,baking powder ,baking soda
  • Add sugar water and oil . Mix well
  • Add the bananas and milk
  • Pour into a loaf pan
  • Top with roasted nuts
  • Bake 20 minutes 200 c on preheated convection setting in the Samsung Smart Oven

 More photos here.

Samsung Smart Oven: Chef Lau’s Chicken Katsudobo Recipe

My daughter and I recently attended Samsung Digital Appliances event called Saturdate with Mom. This is by far one of the better events I have been to, because I was able to bring my youngest daughter with me who, along with other kids, immensely enjoyed watching the chefs husband and wife, the Laudicos, whip up delicious food using the Samsung Smart Oven.

Chef Lau and the Kids during Samsung DA cooking demo

And yes, we want one for our home and I’m sure, the food blog will have more entries 😀

Anyway, one of the dishes prepared was Chef Lau’s Chicken Katsudobo:

Chicken Katsudobo
My not so clear photo.

Ingredients:

  •  600 grams Boneless Chicken Thigh


For the Adobo marinade:

  • 1 cup Soy Sauce
  • 1/2 cup Coconut Vinegar
  • 1 cup Water
  • 4 tbsp. Garlic mince
  • 4 Bay Leaves
  • Pinch black peppercorns

For Katsu Coating:

  • 1 cup Flour
  • 2 Whole Eggs beaten
  • 1 cup Panko Bread Crumbs
  • 3 tbsp Extra Virgin Olive Oil or any healthy cooking oil


For the Katsudobo:

  • 4 Bowls of Cooked Rice ( please use Microwave safe bowl)
  • 4 Eggs (Whole, raw)
  • Simmered Left Over Adobo Sauce
  • Cooked Katsudobo Chicken (sliced in thick strips)
  • chopped spring onions (garnish)

How to Prepare:

  1. Marinate chicken overnight or at least 5 hours. Simmer left over adobo marinade for at least 5 minutes. Coat adobo marinated chicken with Katsu coating
  2. Lightly Coat chicken with flour then dip in beaten egg and coat with panko breadcrumbs. Brush lightly with Extra Virgin Olive Oil.
  3. Put chicken skin side down on the non-stick plate of the Samsung smart oven on top of the low rack. Set Samsung Smart Oven to Slim Fry until you see number 8 setting. Press start and cook chicken 15 minutes one side then turn the other side after 15 minutes for 30 minutes total. Assemble the Katsudobo
  4. On the Rice Bowl add the adobo sauce around the bowl then break the whole egg on the rice.
  5. Set Samsung Smart Oven to microwave 700 watts then cook for 4-5 minutes or until egg is cooked but still soft.
  6. Top with Cooked Chicken Katsudobo then top with chopped spring onions. serve hot!


More  photos here.

Next »